TimeCamp desktop application will give you the ability to do three following things:
- track computer usage - monitor time spent on the computer and generate multiple reports about your computer usage (such as applications usage, visited websites, computer turn on/off times, efficiency level, etc.).
- track time to projects and tasks - it can work in two modes – manual and automatic. Simply select your task and start tracking time.
- useful widget - allows to quickly change tracking mode, choose a task and start/stop tracking time to it.
The desktop app can be installed on Windows, macOS, and Linux. The desktop app is available for all account roles and all subscription plans.
There are a couple of things you need to keep in mind, before starting to use the desktop app:
- the desktop app works in the background, which means it doesn’t have a full interface (apart from the widget)
- from its level you can’t enter time manually/ add notes- you can only start and stop a timer, and assign this time to a certain client/project
- synchronization between the desktop app and web interface takes place every 5 minutes
- if you are working with a team, to access desktop app preferences you need to use the password of the administrator, that invited you to the team
- time tracking settings for the desktop app are available only on your web account
Data that can be registered by the desktop app, depending on the enabled settings:
- the time of computer turn on/off;
- names of visited websites and applications;
- the time span of each activity;
- the away time when computer is inactive;
- screenshots;
- number and time of logins;
Data that is not registered by the desktop app:
- number of mouse movements;
- number of keyboard usage;
- screen recording;
Where to find the TimeCamp desktop app?
You can find the link to download the desktop app on your TimeCamp web account. First, log in to your account and navigate to the plugin icon in the upper right corner. Next, click on the Desktop app option from the menu. TimeCamp desktop app will be automatically downloaded to your computer.

After the application is downloaded, install it on your computer and log in to your TimeCamp account.
It is not possible to log in to the desktop app using the Google account. If you do not remember your password, please use the option "Forgotten password" under the login window in a web app.
After the application is installed a TimeCamp icon will appear on your taskbar.
Windows:

macOS:

Linux:
Track time with the desktop app
The desktop app allows tracking computer time and activities and time spent on projects and tasks.
Computer and projects' time is tracked separately.
Computer time
To track the computer time you need to adjust the settings on your web account. Click on your avatar in the upper-right corner and select the Account Settings option. You'll be redirected to the General tab where you can use the shortcut to get to the Computer Activities settings.


Computer time and activities will be tracked immediately after turning on the computer or within certain working hours that were previously defined in settings.
To check the registered activities please go to the Computer Activities reports.

Projects time
To start tracking time we recommend opening a task widget first. The task widget will allow viewing what exactly task and tags are currently selected. To add the Task Widget click on the TimeCamp icon (right-click for Windows) and mark the checkbox next to the Show Task Widget option. By default, this option is already enabled when you run the application for the first time.
Depending on the Operation System of your computer a task widget will look different and the process of tracking time will be also a bit different.
Windows task widget:

macOS task widget:

Linux task widget:

The task widget and desktop app menu allow you to select or create a new task and start/stop tracking time on this task. Letters M/A are referring to Automatic and Manual time tracking modes. To switch the mode, open the desktop app menu (click on the app icon if using macOS or Linux and right-click if using Windows), and choose the mode from the menu.

If you’re using manual time tracking mode, simply click on the No task option from the widget or click on the option Start a Task from the desktop app menu to select a task and optionally assign tags. After selecting a task from the list timer will be started instantly. To stop tracking click on the Stop tracking option from the desktop app menu or click on the Stop icon on the task widget (for Windows).
Windows:


macOS:


Linux:


If you’re using automatic time tracking mode, the application will automatically select a task and start a timer after it matches the keywords assigned to your tasks with the URL address of the website and the name of the application you’re working on. First, you need to assign keywords in the Projects module on TimeCamp’s website and next set your desktop app to automatic time tracking mode. The timer will be started as soon as the application matches the assigned keywords.
The desktop app will be automatically synchronized with your web Timesheet.
Computer Activities settings
Here you can find the description of some settings that can help to organize your work and define time-tracking rules. Click on your avatar in the upper-right corner and select the Account Settings option. You'll be redirected to the General tab where you can use the shortcut to get to the Computer Activities settings.


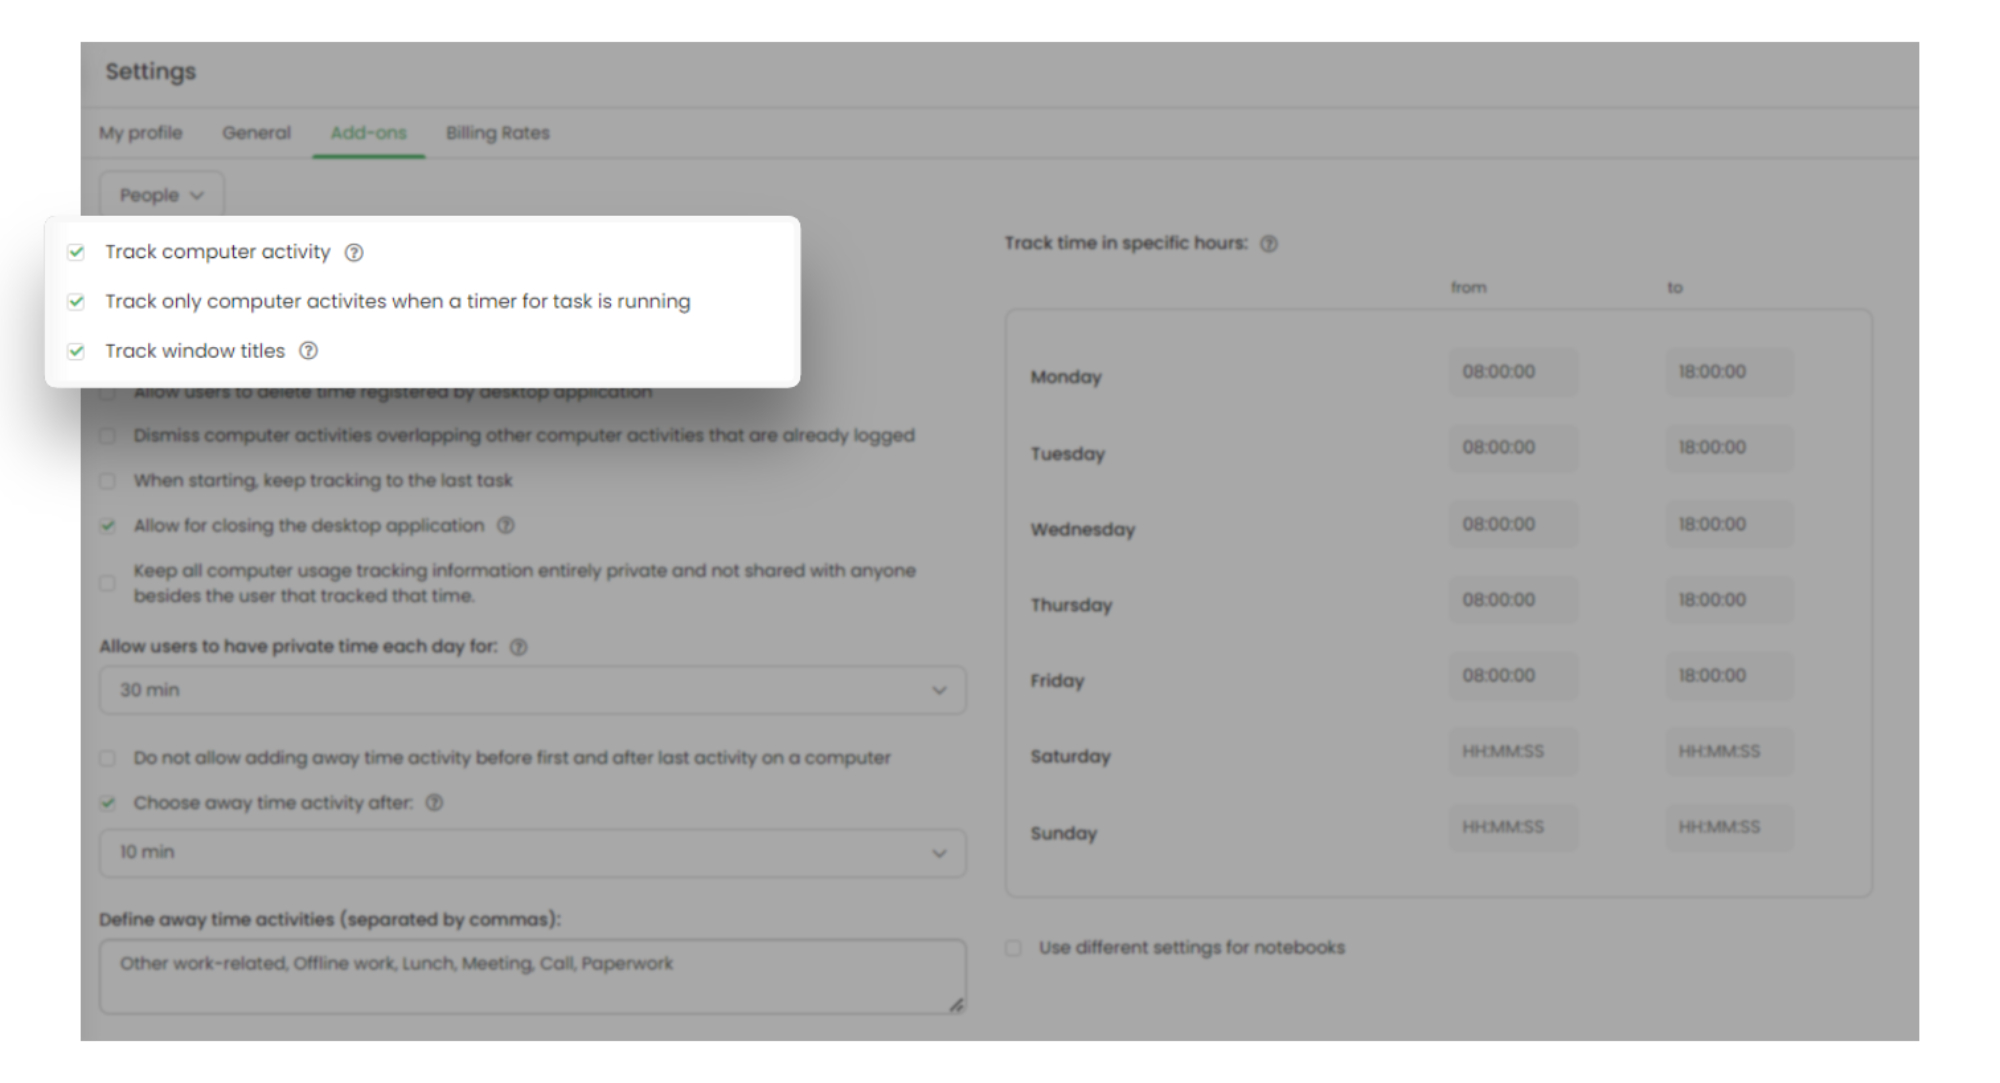
Track computer activity - the desktop app will track computer time (turn on/off times, usage, the away time).
Track only computer activities when a timer for task is running - the desktop app will register computer time and activities only when you start a timer for a task. If the timer is not running, no activities and computer usage will be registered.
Track window titles - the desktop app will register the names of all websites and applications you visit while working.
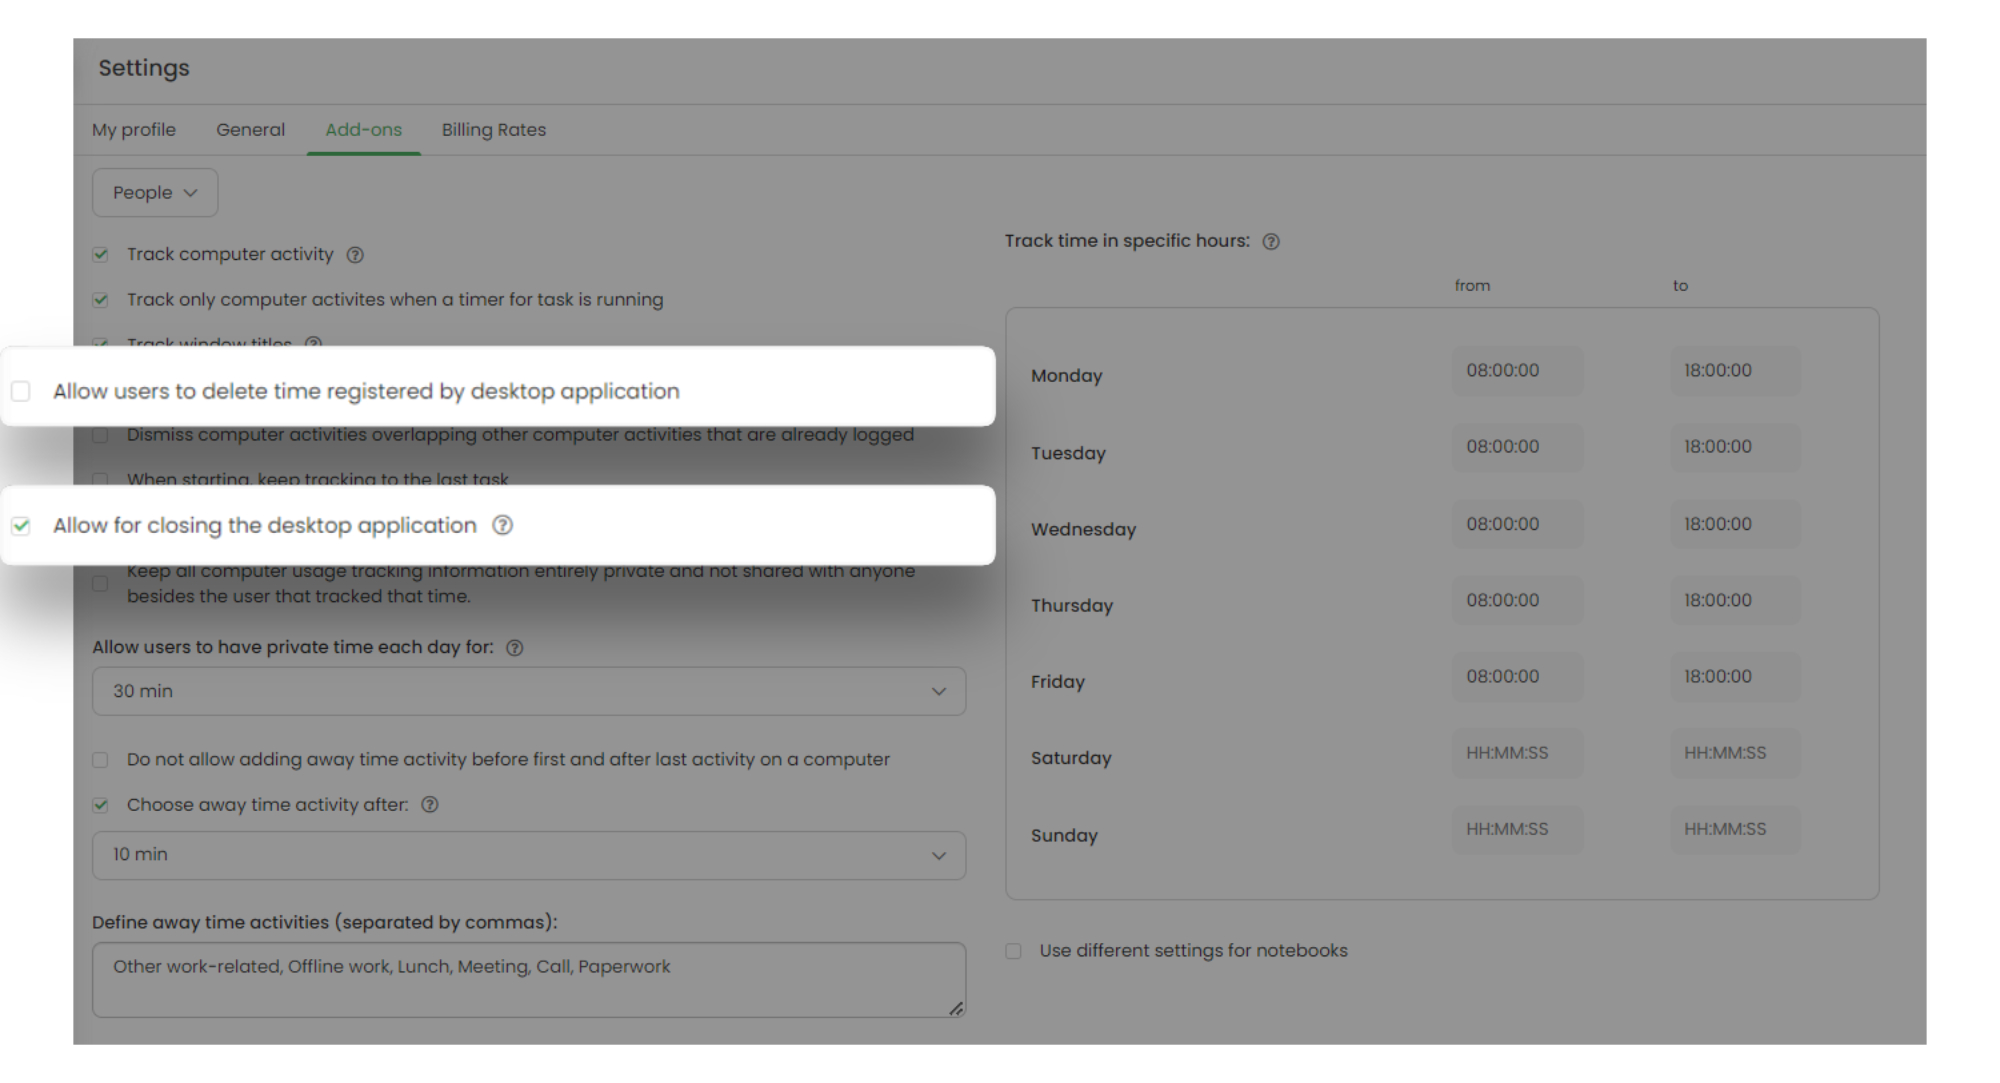
Allow for closing the desktop application - this setting will allow users to close the desktop app without requesting an Administrator's password. If this option is disabled, users have to enter the Administrator's password to close the TimeCamp desktop app.
Allow users to delete time registered by desktop application - if this option is enabled users will be able to delete their registered activities. if the option is disabled only the Administrator of the account will be able to remove activities.
Stop tracking when computer is unused for - if the computer is unused for a certain time, e.g. 5 minutes, the desktop app will stop recording time and activities. This time will be added as the away time.
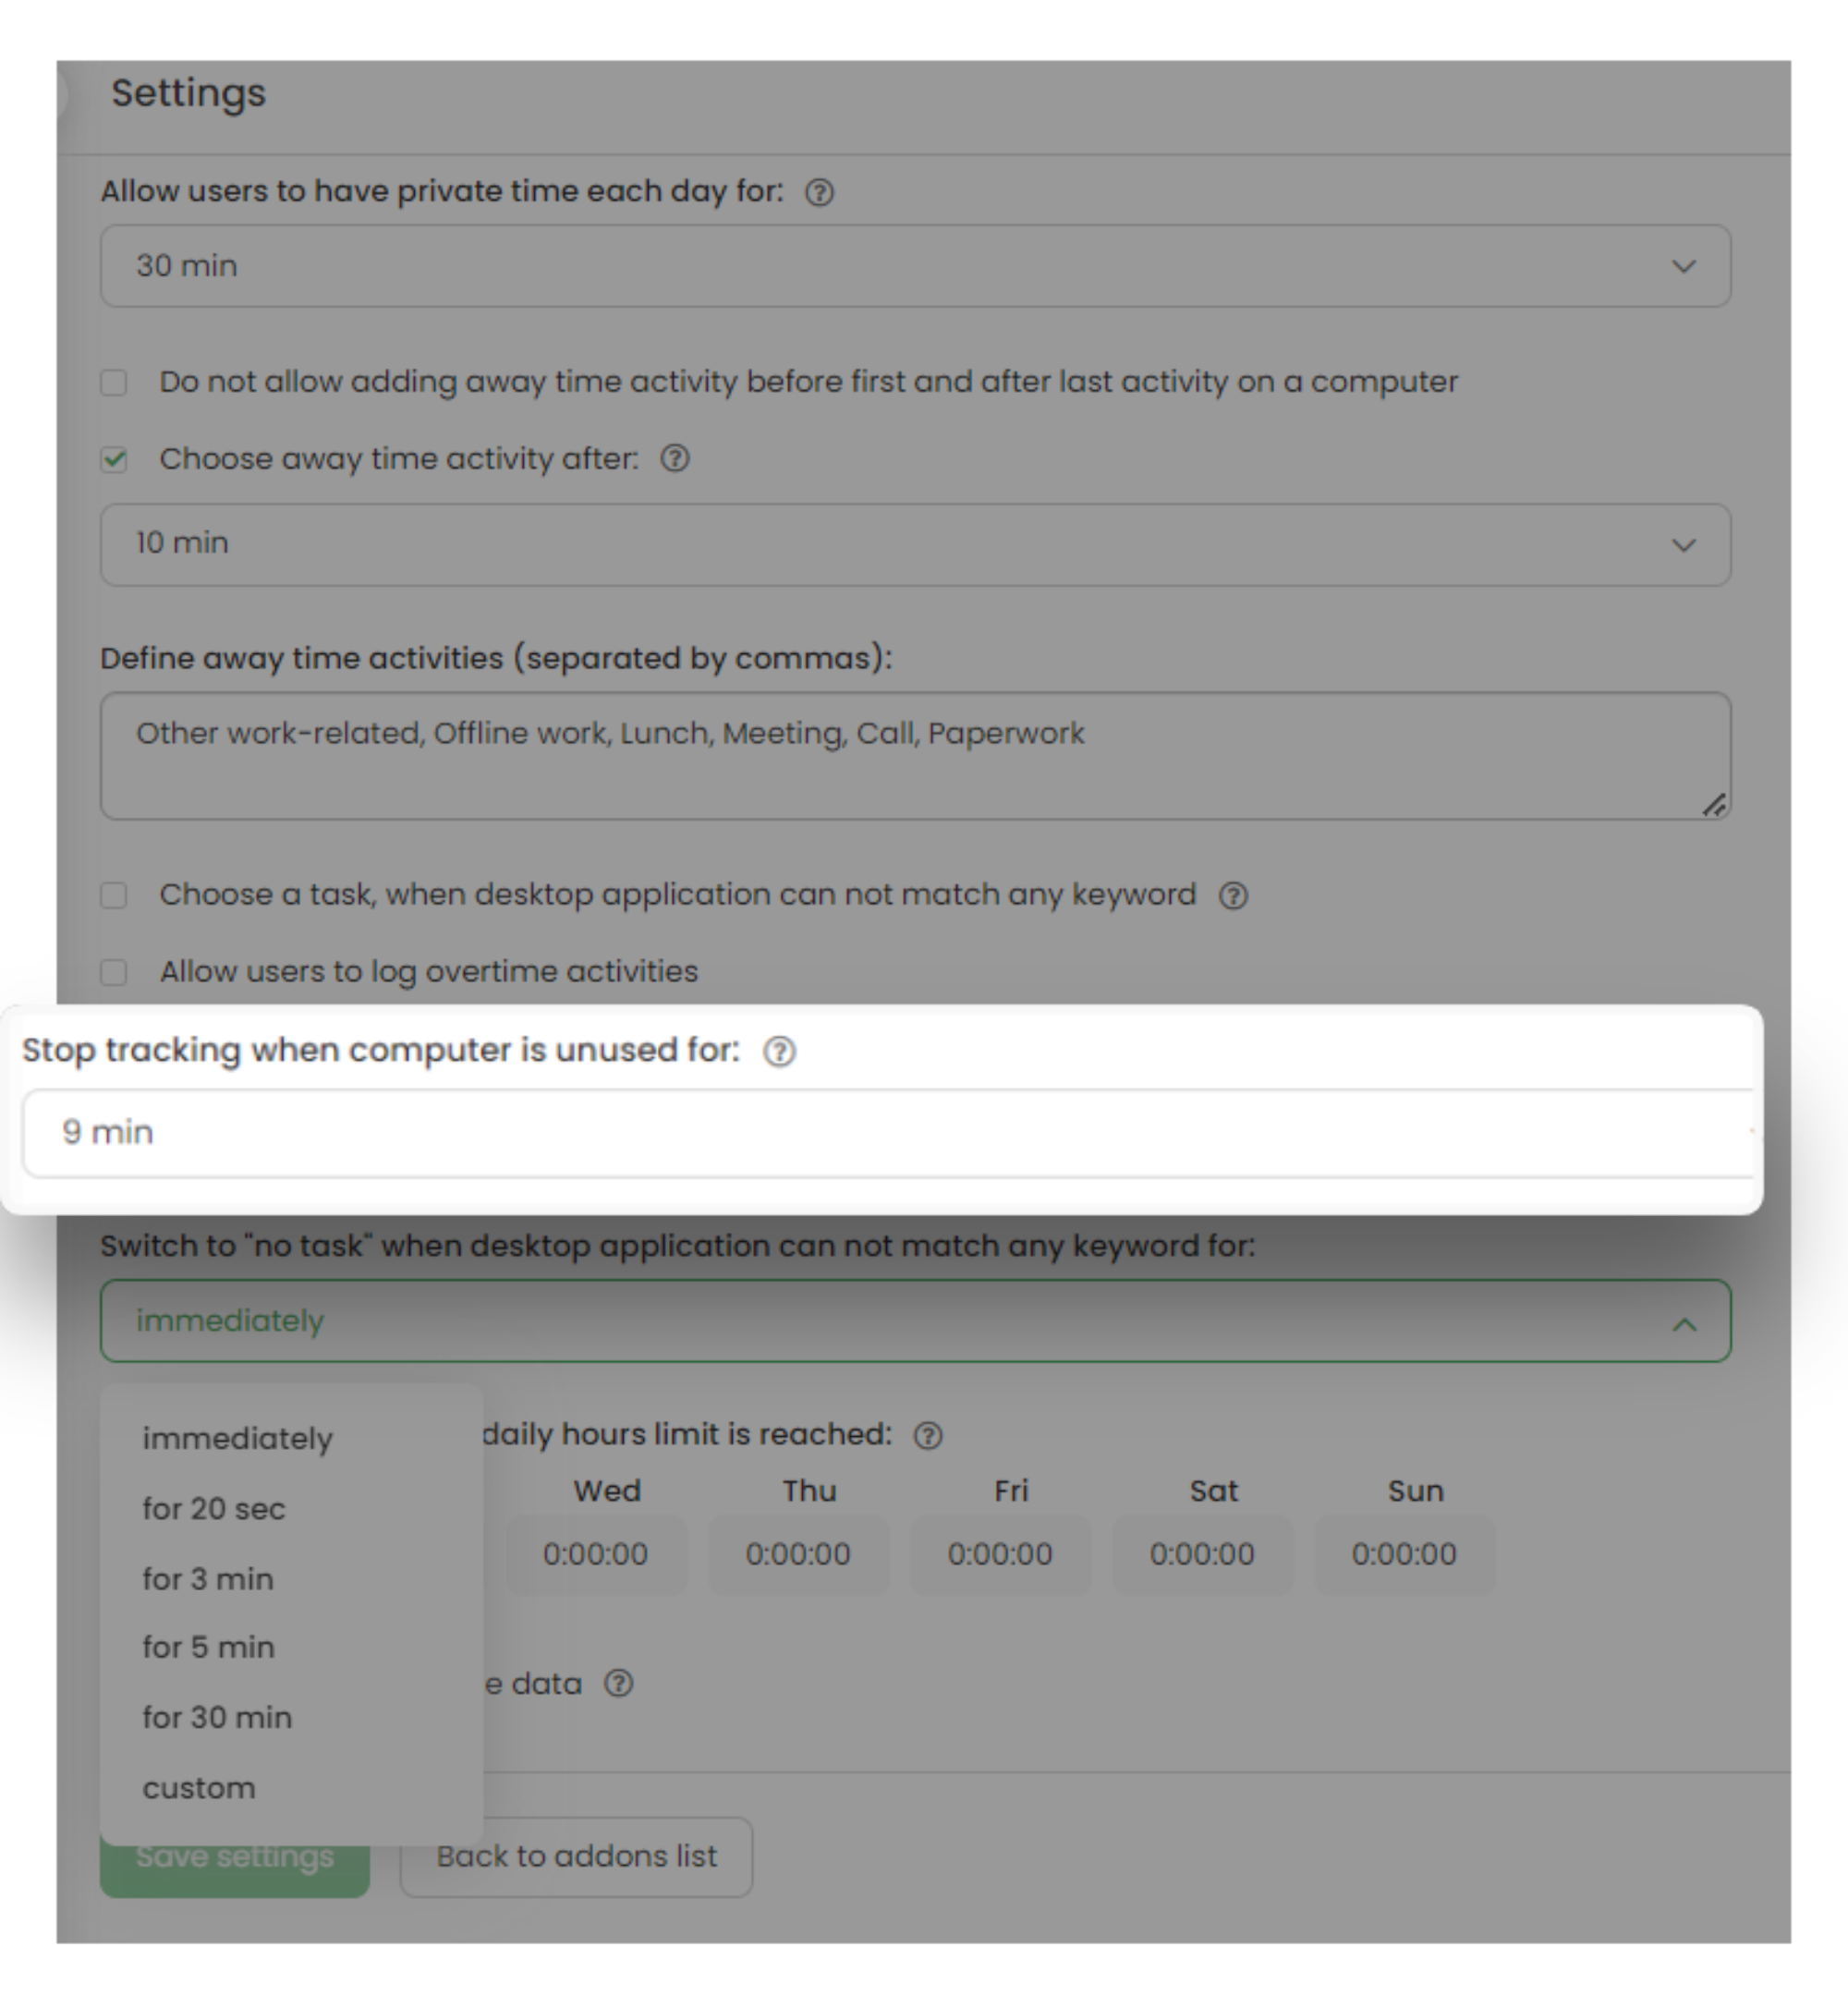
Track time in specific hours - define working hours when the desktop app should track computer time and activities. The application will not register any data before or after the defined hours.

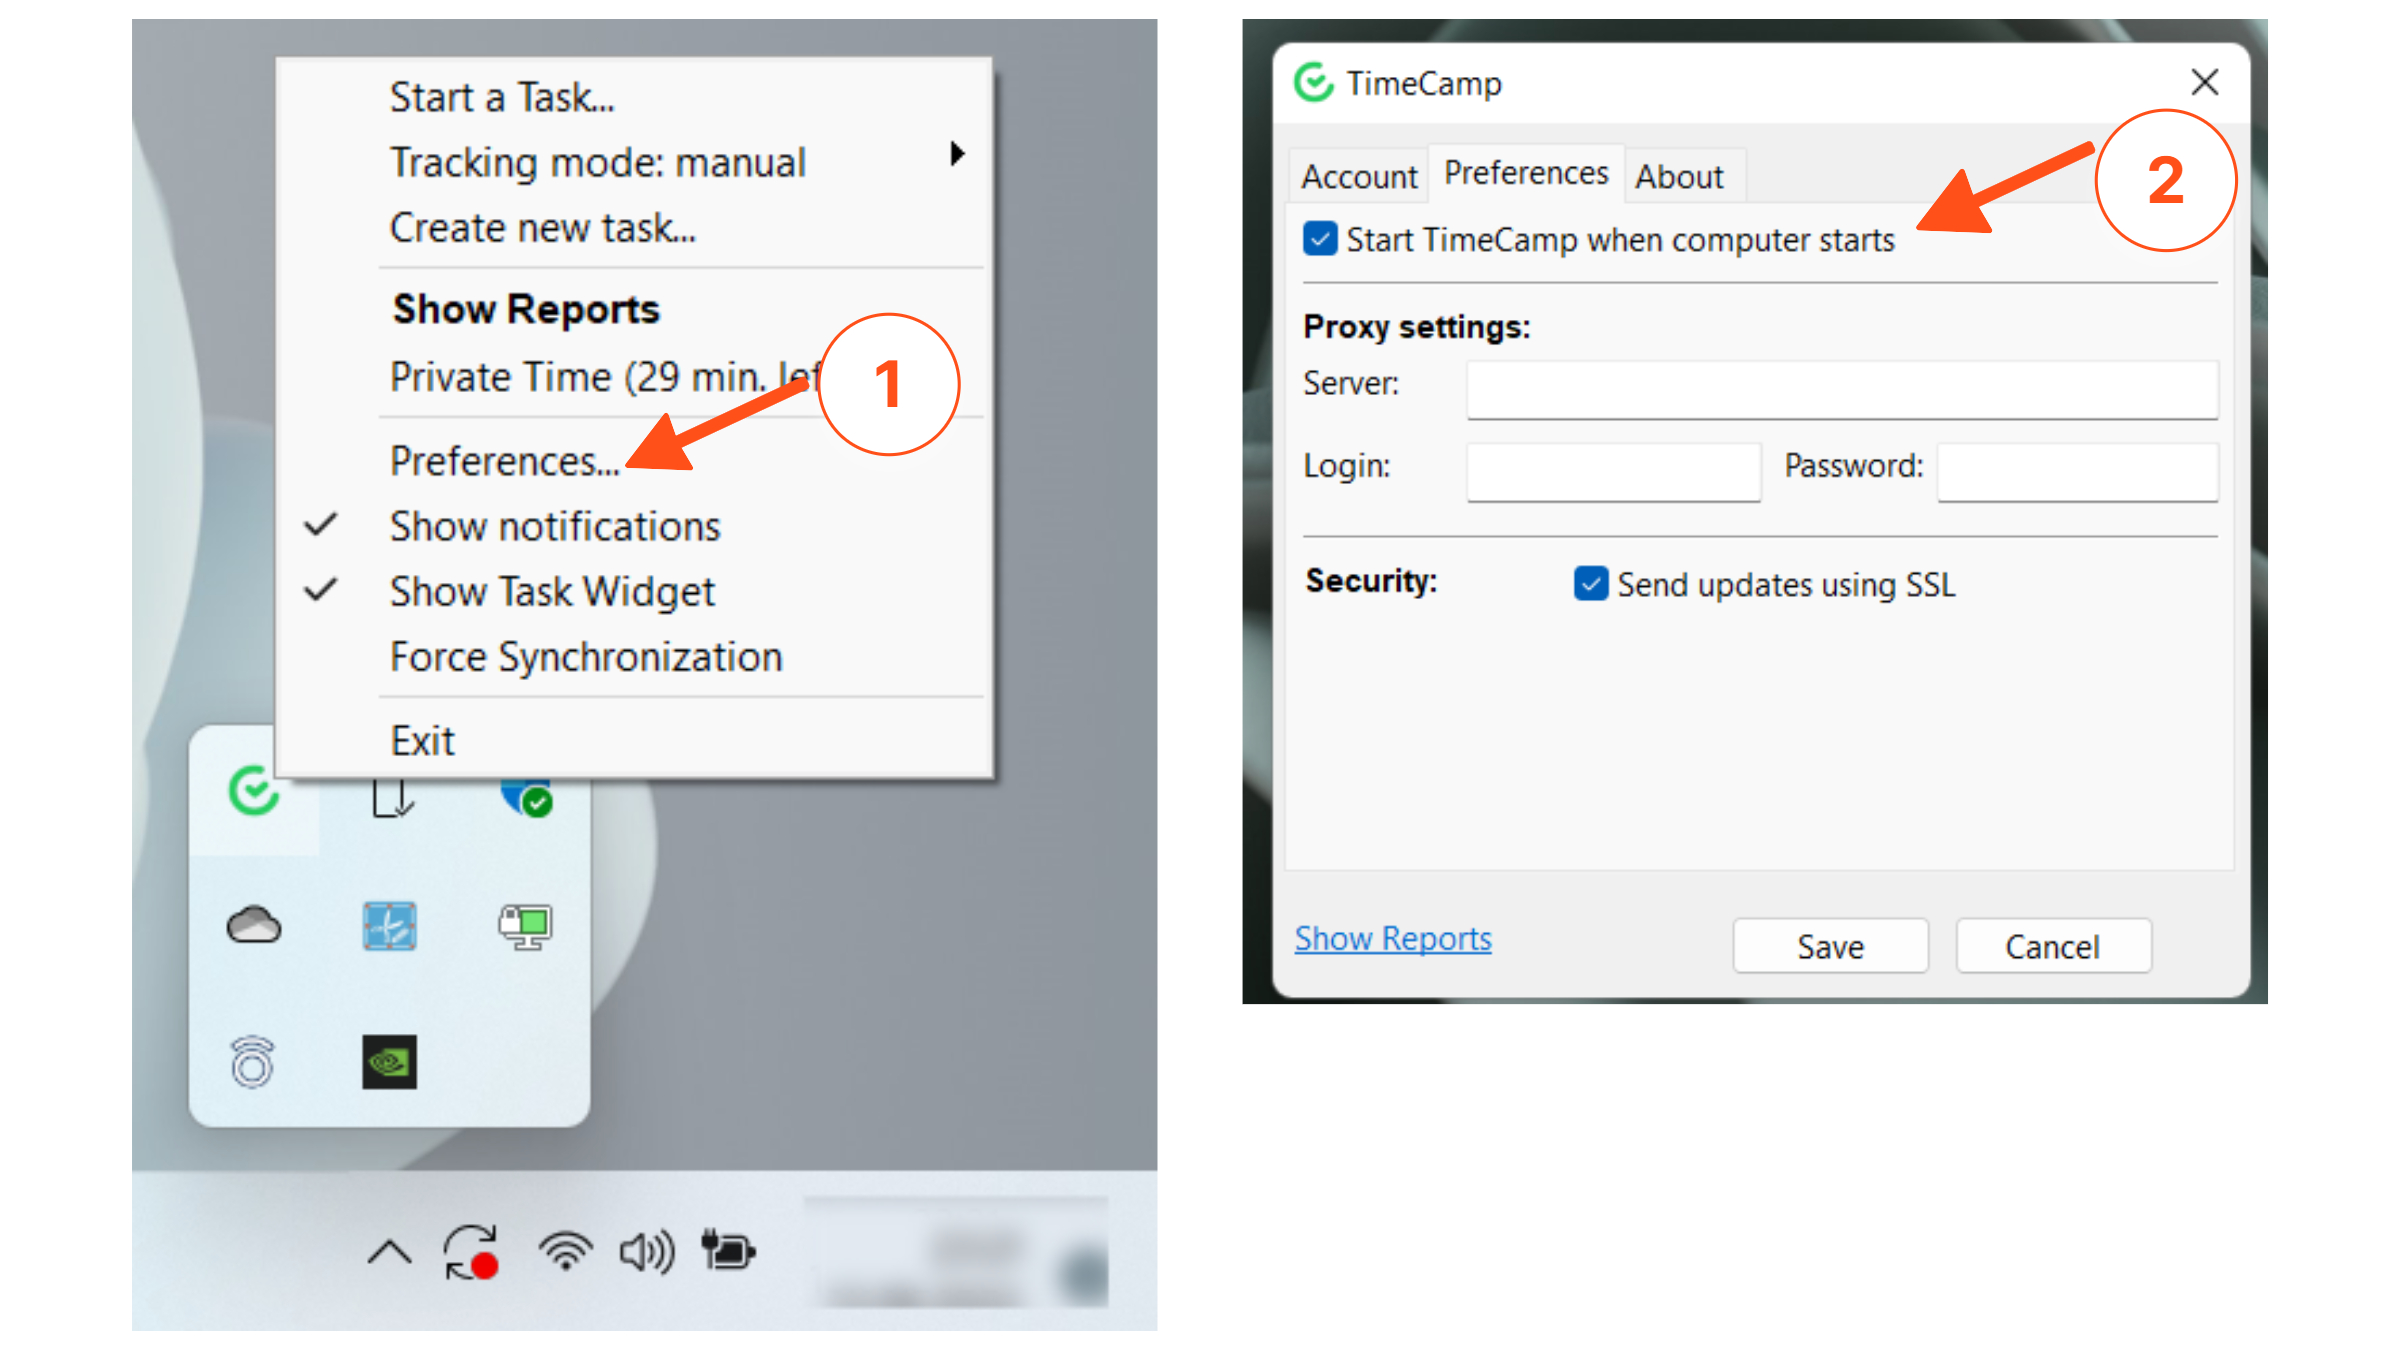
Start TimeCamp when computer starts - the default setting which will be applied if you don't define the specific tracking hours or don't enable the option "Track only computer activities when a timer for task is running". This setting can be modified only within the desktop app menu. Click on the TimeCamp icon (right-click for Windows) and go to Preferences/Options. The administrator’s password is required to get to the preferences menu.


Here you can find descriptions of the full list of computer activities settings.